Upcycling Your Display: Building a Personalized Smart Mirror with Raspberry Pi
For tech enthusiasts and DIY home automation hobbyists, the ability to repurpose older electronics into functional, modern devices is a core appeal of the Raspberry Pi ecosystem. One of the most popular and visually impressive projects involves converting an unused television or monitor into a dynamic, interactive smart mirror. This project not only offers a highly customized smart home feature but also provides a sustainable way to upcycle old hardware.
This guide outlines the essential hardware, software, and steps required to build your own smart mirror, utilizing the powerful combination of a Raspberry Pi single-board computer and the open-source MagicMirror² platform.
Phase 1: Gathering Essential Hardware Components
While the concept is simple—a screen hidden behind a reflective surface—the success of the project hinges on selecting the right components, particularly the mirror material and the computing unit. You do not need the latest or most powerful Raspberry Pi model, but a newer version (like the Pi 4 or 5) will handle complex modules and animations more smoothly.
Required Materials Checklist
To begin this intermediate-level DIY project, you will need the following three primary components, plus several accessories:
- The Display: An old TV or computer monitor (LCD or LED is best). The size and aspect ratio will determine the final dimensions of your mirror. Ensure the display is functional and can be powered on and off easily.
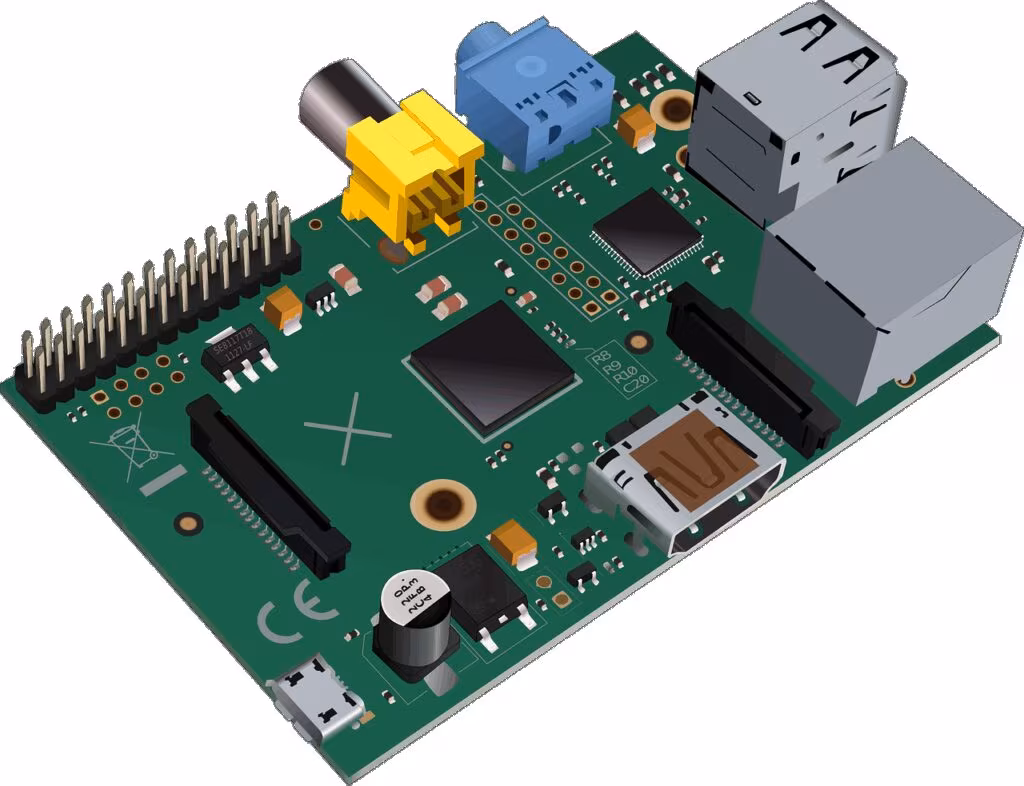
- The Computing Unit: A Raspberry Pi (Model 3B+ or newer is recommended for performance). This small, affordable computer will run the operating system and the mirror software.
- The Reflective Surface: A two-way mirror film or two-way acrylic sheet. This is the critical component that allows light from the screen to pass through while maintaining a reflective surface when the screen is dark. Acrylic is generally lighter and safer than glass.
Essential Accessories
Beyond the core three items, you will require standard accessories to connect and house the system:
- Power Supply: A reliable power supply appropriate for your Raspberry Pi model.
- MicroSD Card: At least 16GB for the operating system and software.
- HDMI Cable: To connect the Raspberry Pi to the monitor.
- Housing/Frame: Materials to build a wooden frame or enclosure to hold the monitor, the Pi, and the two-way mirror securely.
- Input Devices: A keyboard and mouse for the initial setup and configuration.
Phase 2: Software Installation and Configuration
The software backbone of almost every successful DIY smart mirror is MagicMirror². This open-source framework, built on Node.js, is highly customizable and allows users to easily integrate various modules for weather, news, calendars, and more.
1. Preparing the Raspberry Pi OS
The first step is to install the operating system. The recommended choice is Raspberry Pi OS (formerly Raspbian), specifically the desktop version, as it provides the necessary graphical environment.
- Flash the OS: Use the Raspberry Pi Imager tool to write the OS image onto your MicroSD card.
- Initial Setup: Connect the Pi to the monitor, keyboard, and mouse. Boot up the system and complete the initial configuration, ensuring Wi-Fi connectivity is established.
2. Installing MagicMirror²
MagicMirror² requires several dependencies, including Node.js. The project maintainers provide a convenient installation script that automates most of the setup process, making it accessible even for those with limited Linux experience.
- Install Dependencies: Open the terminal window on the Raspberry Pi.
- Run the Installation Script: Execute the standard installation command provided on the official MagicMirror² GitHub page. This script handles the installation of Node.js, necessary libraries, and the MagicMirror² application itself.
3. Configuring the Display and Startup
Crucially, the smart mirror needs to operate without user intervention. This involves two key configurations:
- Disabling Screen Sleep: Configure the Raspberry Pi OS to prevent the screen from going to sleep or showing a screen saver, ensuring the mirror display is always active.
- Autostart: Set up the system to automatically launch the MagicMirror² application in full-screen mode immediately upon boot-up. This ensures that if the power is cycled, the mirror returns to its functional state without manual input.
Phase 3: Physical Assembly and Integration
This phase involves the carpentry and physical integration of the components, which is often the most time-consuming part of the project.
Constructing the Enclosure
The enclosure serves two purposes: to house the monitor and Raspberry Pi securely, and to provide a frame for the two-way mirror.
- Measure and Cut: Carefully measure the dimensions of your monitor and the two-way mirror material. The frame must accommodate the depth of the monitor and the thickness of the mirror.
- Mount the Monitor: Secure the monitor inside the frame. It should be positioned so that the screen faces forward, ready to be covered by the mirror.
- Ventilation: Ensure there are adequate ventilation holes. Monitors and the Raspberry Pi generate heat, and poor ventilation can lead to overheating and component failure.

Applying the Two-Way Mirror
If you are using a film, apply it carefully to a piece of glass or acrylic cut to size. If using a pre-made acrylic sheet, simply secure it to the front of the enclosure, directly over the monitor screen.
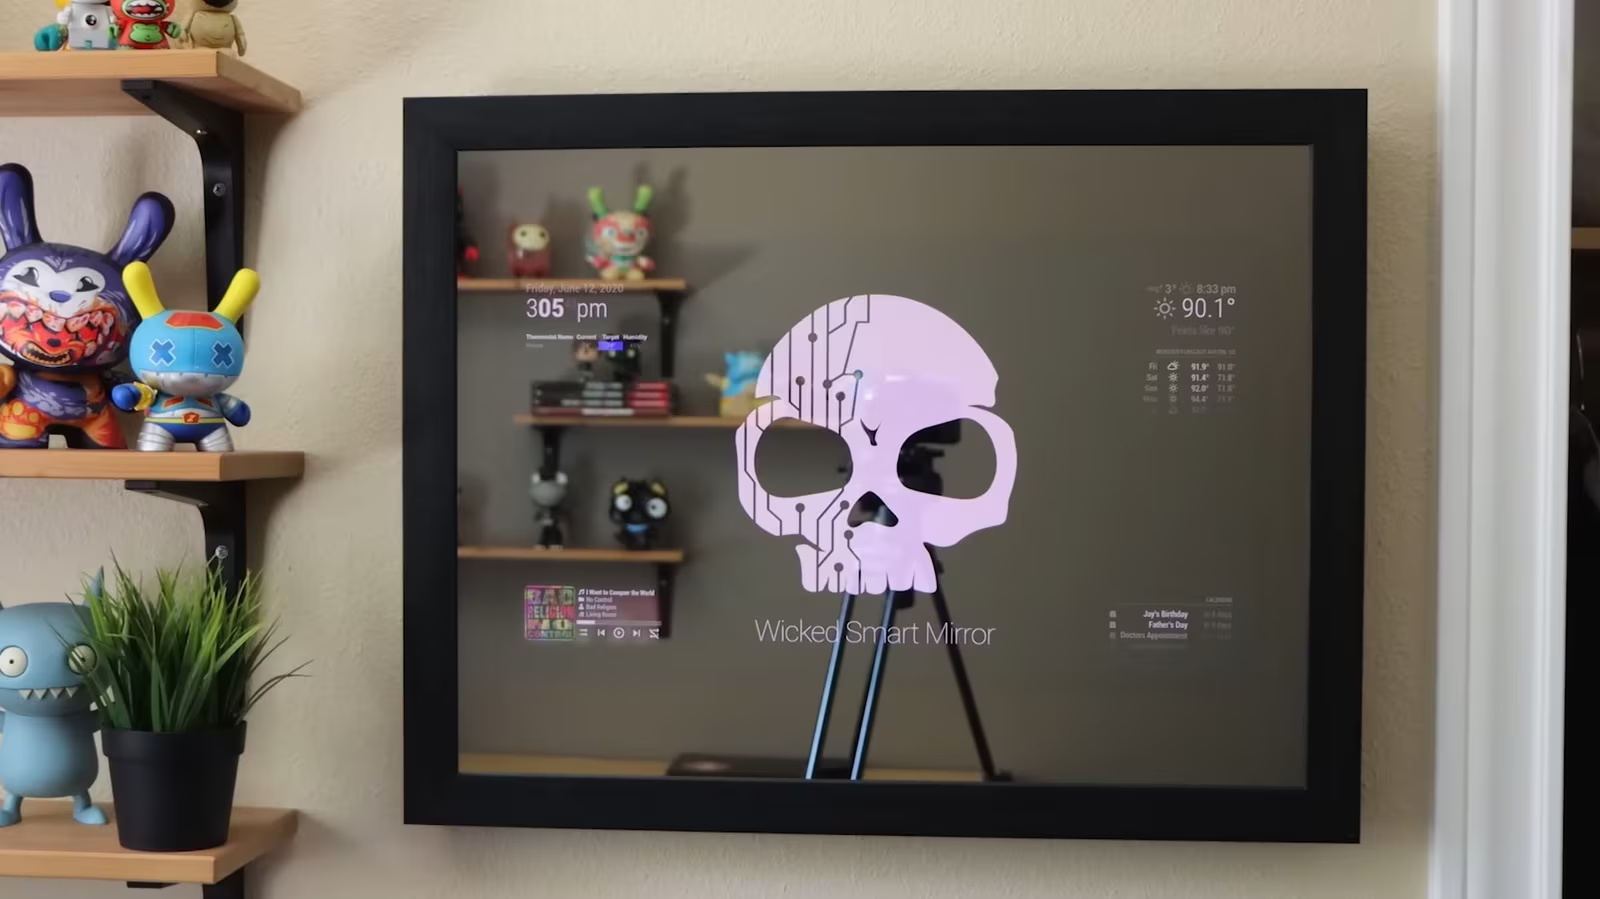
Expert Tip: The two-way mirror effect works best when the room lighting is significantly brighter than the screen display. The monitor should be set to a low brightness level, and the background of the MagicMirror² interface should be pure black to maximize the reflection effect.
Phase 4: Customization and Advanced Modules
Once the physical assembly is complete and the core software is running, the real fun begins: customizing the information displayed on your smart mirror.
MagicMirror² operates using a modular system. The default installation includes basic modules like Clock, Calendar, Weather, and News Feeds. However, the community has developed hundreds of third-party modules that can significantly enhance functionality.
Popular Customization Options:
- Voice Control Integration: Modules that integrate with Amazon Alexa or Google Assistant, allowing you to control smart home devices directly through the mirror.
- Facial Recognition: Modules that use a small camera attached to the Pi to recognize users and display personalized information (e.g., specific calendars or to-do lists).
- Transportation Updates: Real-time public transit schedules or traffic reports for your commute.
- Home Automation Status: Displaying the status of smart locks, thermostats, or lighting systems.
Customization involves editing the config.js file within the MagicMirror² directory, adding configuration blocks for new modules, and adjusting their position on the screen (top-left, bottom-center, etc.).
Key Takeaways for Your Smart Mirror Project
This project is a rewarding way to give new life to an old display, resulting in a highly functional and aesthetically pleasing smart home device. Success depends on attention to detail during both the software configuration and the physical build.
- Hardware Priority: The quality of the two-way mirror material (acrylic or film) is the single most important factor determining the final visual quality of the mirror effect.
- Software Standard: The MagicMirror² framework is the industry standard for this project, offering robust customization and a large community of support.
- Performance: While older Raspberry Pi models can run the basic setup, newer models (Pi 4 or 5) are highly recommended if you plan to use complex, resource-intensive modules like facial recognition or video feeds.
- Upcycling Value: This project provides a practical example of upcycling electronics, reducing digital waste while creating a valuable piece of smart home technology.
Conclusion: A High-Value DIY Smart Home Upgrade
By leveraging the versatility of the Raspberry Pi and the robust capabilities of the MagicMirror² platform, transforming an old, dusty monitor into a sleek, futuristic smart mirror is an achievable goal for the dedicated DIYer. The final product offers a level of personalization and integration that commercial smart mirrors often cannot match, making it a high-value addition to any modern, connected home. The ongoing modular development ensures that your smart mirror can continue to evolve with new technological advancements and changing informational needs in 2025 and beyond.
Original author: Marinel Sigue
Originally published: November 9, 2025
Editorial note: Our team reviewed and enhanced this coverage with AI-assisted tools and human editing to add helpful context while preserving verified facts and quotations from the original source.
We encourage you to consult the publisher above for the complete report and to reach out if you spot inaccuracies or compliance concerns.